Deep Learning model deployment using Flask
Table of Contents
- Pre-request
- Usage / Installation
- Code structure
- Deep Learning Model
- Flask Webapp & Integrating DL model
Pre-request
You should have basic understanding of:
- Python, pip, virtual environment, Flask
- Machine Learning / Deep Learning
- HTML, CSS, JavaScript
Usage / Installation
Local
Clone/download code for this demo from mnist-demo github repo
git clone https://github.com/other-things/mnist-demo.git
Navigate to root of the project and install required dependencies
cd mnist-demo
pip install -r requirements.txt
Run Flask app locally
python app.py
Deploy to heroku

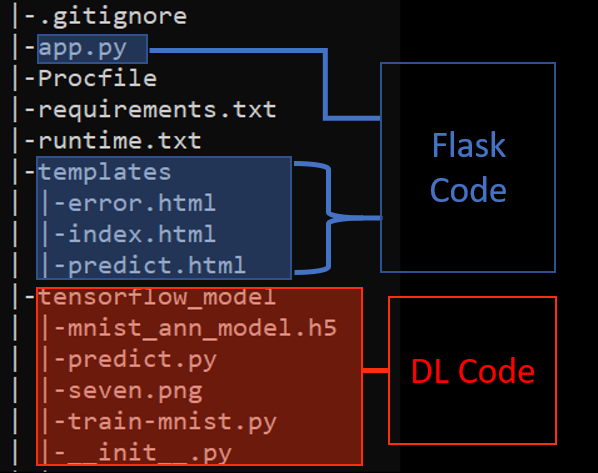
Code Structure
DL Model
Training deeplearning model
train-mnist.py contains the code to train a deeplearning model.
Last line in the code helps us in saving our keras/tensorflow model.
Testing deeplearning model
The model saved during training, is used for testing purpose.
Also we have created our testing script (i.e predict.py) as a module, therefore we can load it easily in other python scripts which we can use during prediction.
Following is the logic used in predict.py:
- Load the model and graph
-
Method
predict_imagetakes image as input and returns image label with confidence/probability -
In
predict_image, first we convert image to gray-scale, save in numpy array and re-shape it to 1x28x28 -
Finally in
predict_image, we pass this test image array tomodel.predictmethod, which help us in predicting the most probable label with its probability
Flask Webapp & Integrating DL model
The main python file for our webapp is app.py, which contains following major logic.
We have method upload_file() which handles the index/root route path, for both GET and POST request type.
If the request type is GET we display index.html template file.
When request type is POST, user is trying to upload the image file.
We validate the name, type of the uploaded image and redirect to error page if any validation error.
We have also loaded our predict_image (as model_predict) method from predict.py, which helps us in predicting label for the given image.
So, if image valid we call our model_predict which takes input parameter as image file and return label & label’s confidence probabilty.
And finally we redirect to new route method (file_predict()) where we display the predictions.
We also have a method called file_predict() which helps us in displaying the prediction result using predict.html template file.
predict.html has the template which displays predicted label value, predicted label confidence and original image.
Similarly, index.html has the template which allows us to upload the image, on which to predict.